Celestial Navigation: Mastering The Basics
The back-up method you will not regret learning.
Celestial Navigation: The Sky Is A Roadmap
In this computer age, navigators have become heavily reliant on apps and GPS chartplotters. But many sailors still enjoy the challenge of celestial navigation. The forgotten art of celestial navigation is a good way to keep your brain engaged during long passages, and makes a fun game for the entire crew to get involved with. Particularly older kids and teenagers who can use their celestial knowledge as part of a scientific educational program.

Since celestial navigation is a comprehensive subject which can take days, months, or even years to learn, we recommend reading this blog in conjunction with a technical Celestial Navigation book. This celestial navigation guide learns the parts of the marine sextant and how to use it to measure an angle to the sun.
What Is Celestial Navigation?
Celestial navigation is mastering the art of navigating a vessel or determining its position on the Earth's surface using celestial bodies, primarily the sun, moon, stars, and planets.
Historically, the method was used by sailors to navigate across the oceans. Celestial navigation requires knowledge of astronomy, the use of navigational tools, and the ability to interpret and calculate celestial data.
What Tools And Equipment Do I Need For Celestial Navigation?
A sextent, nautical almanac (this changes annually), a chronometer, a sight reduction form, a Sight Reduction Table, and a Plotting Sheet.
Celestial Navigation: What Does It Involve?
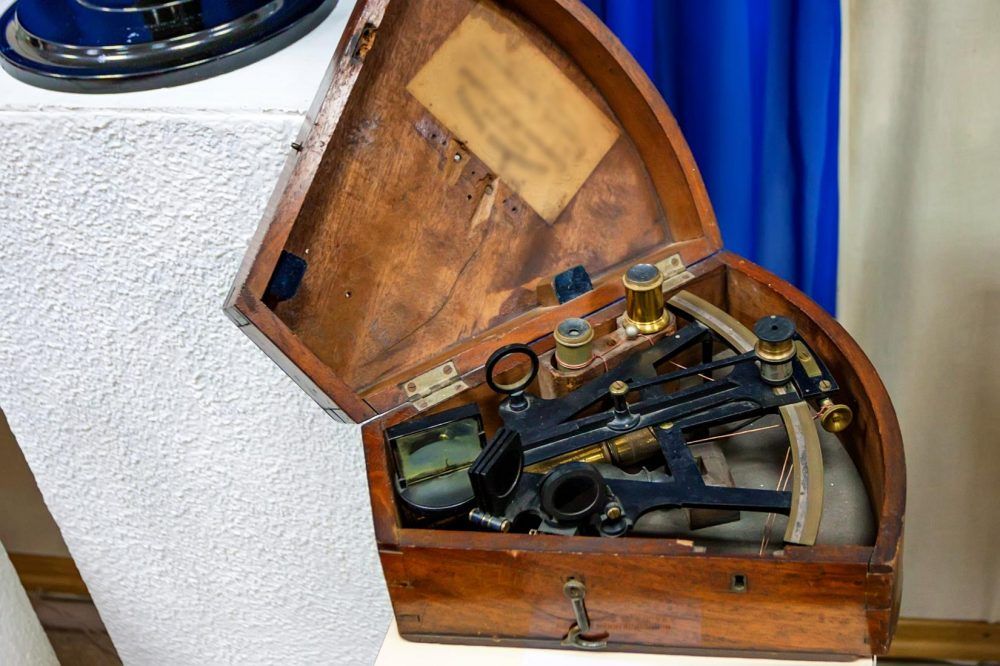
The process of celestial navigation involves taking and recording a celestial sighting. Use a sextant to measure the angle between a celestial body, such as the sun, moon, or stars, and the horizon. These measurements are known as sights. A sextant is nothing more than a glorified protractor. The telescope component enables the navigator to get an amplified view of celestial objects. A marine sextant is far more precise than a human eye.
1. Calculating the Celestial Body's Position
Using the sight data, the navigator consults nautical almanacs or tables that provide the celestial bodies' positions at specific times. By comparing the observed angle with the predicted angle for a given celestial body at a specific time, the navigator can determine the celestial body's position at the time the observation was taken.
2. Plotting the Lines of Position
The navigator plots the observed positions of the celestial bodies as lines on a nautical chart. These lines are known as "lines of position" (LOPs). Where these lines crossover or draw close to each other, the navigator can determine their approximate position.
3. Dead Reckoning and Time Updates
Once the hard work is done, you can update the position further as the boat travels. The navigator takes into account the vessel's previous position (dead reckoning) and makes adjustments based on time updates. By comparing the observed celestial positions with the vessel's estimated position, the navigator can make corrections and obtain a more accurate read.
How Do I Use A Marine Sextant?
When you drop anchor, it’s a great time to practice taking readings from your sextant tool. Or, why not practice sitting at home on a winter's day. You can use the horizon at it at a beach, or you can purchase or create an artificial horizon and use it at home so that you can practice enough so that when you're at sea, your measurements are second nature.
Components And Its Functions
The shade components act like sunglasses and come in various magnitudes, and are used to dim bright objects such as the sun and the moon. It works by moving two mirrors in relation to each other. The index mirror moves while the horizon mirror does not.
There are two ways to move the index mirror. The first is with the squeeze the trigger on the index arm for gross adjustments. This enables you to line up the sun, or whatever celestial body you are sighting in the horizon mirror. The second way of adjusting the index mirror is with the micrometer drum screw, which is used for fine adjustments by turning the drum screw on the side of the locking device around. The two mirrors have to be exactly straight to provide an accurate reading.
Note that zero is not all the way back on the sextant. A very small adjustment gets the sextant to zero degrees in one minute. One minute of arc on the sextant equates to one mile of accuracy and measurement on a chart.
How To Read A Sextant
You can measure the altitude of the Sun above the horizon by following the these simple steps:
- Set the sextant to zero. Read the instrument carefully to make sure that you are actually at zero. A sextant is set to zero degrees and zero decimal, zero minutes.
- Set the shades on the horizon glass and index class for eye protection. Once you have my shade situation covered, look through the telescope directly at the sun. You are interested in shooting to the center of the Sun. That's really difficult to do with the sextant, therefore you must shoot to the lower limb of the sun. The picture we want to see through the sexton is the sun balanced on the horizon like a golf ball on a fairway.
- Measure the angle between a celestial body (the sun, moon, or stars) and the horizon. You do this by adjusting the micrometer drum by about 30 minutes of arc while you are looking at the sun. This allows you to separate the sun into two distinct images. Take the lower image and follow it down to the horizon.
- Use two distinct motions to bring the sun down to the horizon, the first is that the index arm moves forward. The second is that the section itself comes down to the horizon together. All the while the index arm moves forward as the sextant comes down, working on moving the sun as close to the horizon as possible. Once the sun is close to the horizon, use the micrometer jump to fine tune the adjustment, keeping the sun in sight.
- Swing the section in an arc while adjusting the micrometer drum so that the sun pitches an arc through the image and touches the horizon at the bottom of the arc. As the sextant rocks back and forth, the sun traces an arc through the image. The lower limb of the sun should touch the horizon at the bottom of the arc.
- Note the reading in degrees and decimals, then take down the time that you measured the angle in minutes right to the second. Read the sextant two or three times to ensure that the reading is accurate.
By observing the altitude of the Sun above the horizon you can learn how far we lie from the Sun’s Geographical Position (GP) by the data we extract from the Almanac at the time of our sight. So, if we observe any body 60º above the horizon, we know instantly that we lie 30º (1,800 Miles) from the GP. Again, GP stands for the Geographical Position of any celestial body. The GP is the point on the Earth's surface directly beneath the celestial body, where it would appear at the observer's zenith (directly overhead). For example: If a star or the sun is 60º above the horizon, it means you are 30º of latitude or longitude (depending on the direction) away from its GP, translating to 1,800 nautical miles (since 1º equals approximately 60 nautical miles).
It’s useful to bear in mind that your sextant altitude tells you instantly how far you lie from the celestial body’s Geographical Position without complex trigonometry or fancy maths. The GP is tabulated in the Nautical Almanac for every second of the year. When you have a Position Line you are halfway to knowing precisely where you are.
The Next Step Of The Process
The difficulty of Celestial Navigation is that you cannot plot the information you would have just worked out and plot it directly onto a chart. Maths is a solution to this problem, rather than being used as a means to discover your position. You already know where we are and the maths enables you to plot down your location on a graph. A common misconception is that you need the maths to determine where you are located.
Calculating what the sextant altitude would be from an imaginary position using Dead Reckoning Position, Estimated Position, and Assumed Position, depending on the method you choose and then comparing this with the altitude you previously observed to determine and plot how far we lie from this imaginary position. Ideally the Assumed Position will be close enough to our actual position to be plotted on a chart of appropriate scale.
For this stage of the process you will require a Sight Reduction Table to calculate what the altitude of the sun should be at your assumed position.
Depending on the method used whether it is using tables, a calculator, or computer, the process involves carrying out a series of steps with a high degree of precision. During this part of the process most navigators end up venturing astray but through practicing a lot, you can master the art of accurate celestial navigation.
If you would like to read a book on celestial navigation we recommend "Common Sense Celestial Navigation" by Hewitt Schlereth.
If you are interested in stargazing then read Stargazing Learn Six Key Star Patterns In 30 Minutes