Installing a Solar Vent
A solar vent can keep a boat smelling a lot better, and prevent mold and mildew all year long.
February 2, 2011
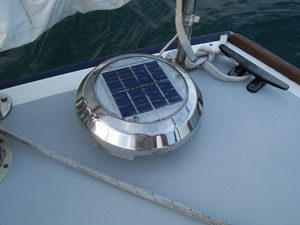
One of the best products ever created for a boat is the solar vent. These vents use solar power and a rechargeable battery to keep a fan going 24 hours a day. Our J/35 came with a cowl vent on the aft deck, but no solar vent installed. I bought a Nicro N20703S solar vent, and here’s how we installed it on the aft deck.
Testing out the solar vent's positioning
1. Position the Vent
I would have preferred to use the hole for the cowl vent, but it was too close to the tiller and would have interfered with the checkstay lines. I looked below deck for wires or hardware, and above deck for anything else that might need the same deck space. After fidgeting and fiddling way too long, I marked the spot and got out the hole saw.
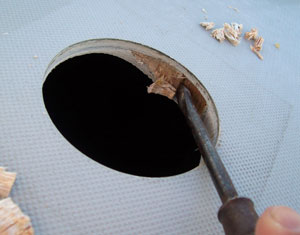
2. Cut the Hole
I actually happened to have the right size hole saw, and used a cordless drill. (A jigsaw would have worked fine instead.) It took everything that two fully charged batteries could give in order to finish the hole, which seemed strange until I realized that the core tapered at the edge of the deck. Most of the hole went through a cored area with thin fiberglass skins, but the rest was through about half an inch of solid glass at the edge of the deck. No wonder the drill was about ready to die!
Luckily, with a solar vent, the deck thickness really doesn’t matter, and nobody will see the underside anyway.
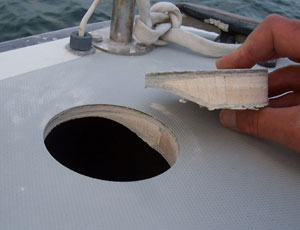
3. Seal the Core
Balsa core is a fantastic core material – “nature’s honeycomb”, great compression strength, fantastic when flexed repeatedly, cost effective, etc. - until it gets wet. So the key is to seal any holes or exposed edges when installing new hardware. When surveying a boat, so often the deck core will be dry, except in areas where something was installed without sealant after the boat was built. “Just” a few padeyes for the dodger, or “just” a cheek block, or “just” a solar vent are all it takes to have a soft, delaminated deck section 5-10 years later. Fortunately this core was bone dry and hadn’t seen daylight since it was installed in 1988.
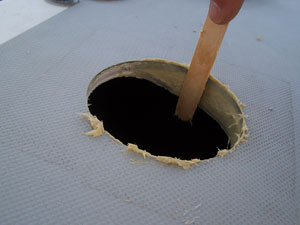
The key to a good seal is to rout the core back from the edge of the hole and seal the whole edge with a solid waterproof putty. I used a screwdriver to remove most of the core about 3/8” back from the edge of the hole, and a wrench to clean out any remaining core sticking to the top and bottom skins. This does not have to be a precision process, and those were the tools on hand. (If this were a smaller hole, say for a fastener through a cored deck, a small screwdriver from above and below works well to remove the core.)
4. Fill The Edge
To fill the edge, I used a Vinylester putty – the same putty I used to fill gouges on our keel. Mixing small amounts of any resin can be tricky, and I use a syringe to add the MEKP to the resin or putty. As I mentioned in the previous article on keel repair, http://features.boats.com/boat-content/2010/10/keel-repair-and-hull-fairing-the-dusty-details/ about 50 drops from a small syringe tip will equal 1cc, and the maximum amount – 3% is around 1cc per ounce. Mixing a small test cup while you are removing the core is also a good way to be sure your ratio is right.
Filling the edge isn’t too tough. For a big hole like this, just work the putty in and try not to trap any air as you do. For a smaller hole, such as for a fastener into a cored deck, tape over the bottom of the hole, and fill from the top – either with a syringe or a sliver of a stir stick. Again, try not to trap air as you fill it in.
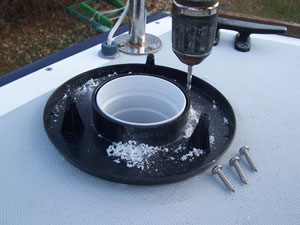
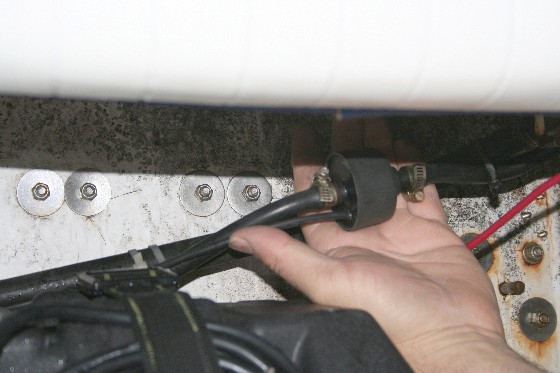
5. Mark and Drill the Holes
It actually wasn’t until this fall that I finished off the installation. The vent sat happily in its sealed hole for the last third of the summer without fasteners, but it was probably leaking air around its base. To finish the process, I drilled through the vent’s base to mark for the fastener holes. It was a pleasant surprise to see that the core-routing had gone deep enough around the hole that the fastener holes were within the ring of putty rather than through the core. (I wish I could say that I had planned that . . .) Once the holes were started, I removed the vent base to finish them.
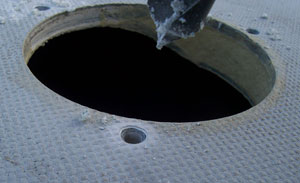
6. Countersink the Holes
Once the holes are drilled for the screws, it’s a good idea to countersink them a bit – for two reasons. First, a self-tapping screw will splinter the gel coat around a hole that isn’t countersunk. Secondly the countersink creates a spot for the sealant to form a gasket around the screw. Otherwise, almost all the sealant will be squeezed out, and it seems logical that a little movement could easily start a leak. I can’t say I’ve ever proven this, but the theory makes sense to me.
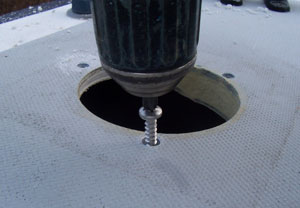
7. Dry-Fit the Screws
Unfortunately, I have proven that skipping this step can cause a “frustrating mess.” Especially when using self-tapping screws through fiberglass, it can be tricky to get the pilot hole size correct. You don’t want to have the hardware in place, sticky with generous amounts of sealant, and find that the pilot holes are too small—or worse, that you just wrung the head off a screw. Sending the screws through once will assure that it goes together as planned, before the goop is involved.
8. Goop and Finish
All that’s left is to put plenty of sealant around the opening and the fastener holes, install the base, and fasten the vent to the base. I used 3M 4200 Fast Cure for this, but other sealants, such as Sikaflex 291, are great for this too.
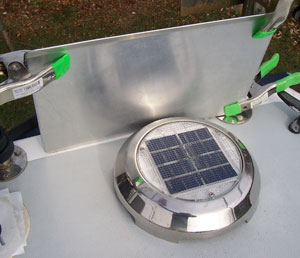
9. One More Experiment . . .
To reflect more light into the solar panels when the sun is low in the winter, I set up this high-tech reflector system. With any luck, it will help to keep the batteries charged so the fan runs through the long winter nights. And, yes, we’re missing a cookie sheet from the kitchen!
Editor's Note: This story is part of a series on buying a used J/35.
Paul Grimes is an engineer and marine surveyor living in Portsmouth, RI. For more information, visit the Grimes Yacht Services website.