Replacing A Rub Rail
Your fiberglass boat's rub rail doesn't have to be forever
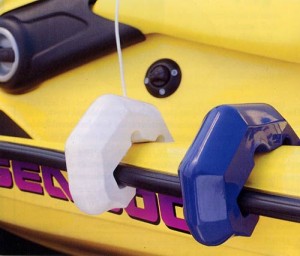
Fiberglass boat gunwales are surrounded by metal and aluminum protection variously called a "bang rail" or a "rub rail." Its obvious purpose is to absorb the impact of close encounters with dock pilings. A less obvious purpose is to cover the joint between the hull and deck. "Bang rail" is a good name because season after season it takes a lot of banging with each less-than-perfect docking recorded as a cut, scrape, dent or scratch. It's as if the boat doesn't want to forget your mistakes at the helm.
The only way to wipe the slate clean is to replace the rub rail. This is not a project to be taken lightly. New rub rail is expensive, costing at from $6 to $8 per running foot. An average 30-foot boat will require approximately 70 feet. Removing the old rail and installing the new will consume the better part of a working day. On the up side, however, few projects do as much to improve the appearance of an older boat as a bright, new bang rail.
Rub rail styles change slightly from year to year. It may not be possible to purchase an exact replacement for the original rail on the boat. The critical dimension is the width of the new one, which should be as close to the old as possible. A smaller width raises the possibility the new rail won't cover the hull to deck joint properly. An overly wide rub rail may extend beyond the fiberglass lip intended to support it.
Most rub rails consist of a metal track (aluminum or stainless steel) with a molded rubber insert. These two parts are often priced separately to reduce sticker shock, but both are necessary for a complete job. Metal tracks come in 12-foot lengths while the insert is sold by the foot off a roll. Purchase an uncut length of insert long enough to go completely around the gunwale of the boat. Tracks are sold only in full 12-foot sections, so there is always some waste.
Catalog houses do not stock rub rail because the sections of track are too long for shipping via United Parcel Service. Truck freight is prohibitively expensive on a small shipment for just one boat. New rub rail must be ordered through large chandleries which get regular deliveries from large wholesalers. Delivery time on rail can range from overnight to six weeks depending upon the style chosen and the time of the year.
Pro Tip: Know Thy Transom
When measuring for a new rub rail don't forget the full width of the transom. The boat must be measured around the outside perimeter of the gunwale. A 50-foot measuring tape works best. Only one gunwale length has to be measured as the two sides of the boat should be symetrical. Double the gunwale length and add the transom width. Buy a couple of feet extra rubber insert. Divide the total length by the length of the track section to determine the number of sections needed.
| Example |
| Gunwale Length 32' x 2 |
| —-- |
| 64' |
| Transom Width + 11 |
| —-- |
| Length Needed 75' |
| Extra + 2' |
| —-- |
| Length To Buy 77' |
Removing The Old Rail
Somewhere on the boat there is a gap where the ends of the old rubber insert meet. It is usually located on the centerline at the stern. Using a screwdriver, pry the old insert out of the track and begin tugging. It should be possible to walk around the boat pulling the insert out of the track. Occasional hard spots where the insert won't budge out of the track should be expected. These are places where the track was bent by concussion with a hard object. Prying the edges of the track should free the insert enough to continue pulling it out. Don't worry about damaging either the old track or the old insert as both are just scrap.
Once the insert is out, the process of removing screws begins. Oval head self-tapping screws are commonly used to hold the metal track to the boat. Expect a screw every six to eight inches. This part of the job can be done with a hand screwdriver, but that amounts to self abuse. Instead, chuck a phillips bit into a reversing, variable speed drill motor and use electric muscle to pull the screws. Try not to damage the screw heads as stainless steel self-tapping screws are expensive. The goal is to re-use as many screws as possible.
Two people should work together. One handles the electric screwdriver while the other manages the floppy end of the old metal track. Things get floppier as screws are removed. Old aluminum track can be cut into convenient lengths with a band saw for recycling through regular aluminum collection centers.
Installing The New Rail
Starting at the centerline of the stern, new metal track is installed re-using as many of the old screws as possible. It's best not to force the mounting holes in the new track to line up with the old holes in the fiberglass. The old holes are probably a bit oversize and won't hold the screws tightly. New holes should be drilled. Two electric drill motors will speed up the procedure: one for drilling the holes, the other with a screwdriver bit for tightening the self-tapping screws. A power screwdriver is almost an absolute "must" for this job. More than 200 screws can be used on a 30-foot boat.
It is vital to stand back and observe the installation of the new track from a small distance every few feet around the . The track must follow the sheerline of the boat with no humps or hollows. Trust your eye rather than measurements. If it looks good, it's probably good. If it looks bad, it's absolutely bad.
Again starting on the centerline of the stern, begin snapping the insert into the track. There's a theory that the insert should slide right down the track like a train pulling into a station. It's a nice theory, but things seldom work out that well in reality. Instead, the insert usually has to be laboriously pushed into the track one inch at a time around the entire boat. Work from the bottom side of the insert with a stiff putty knife or straight-blade screwdriver. It takes a while to get the knack. Two people make the job go faster. One does the actual inserting while the other uncoils the rubber and holds it in position.
Oval head sheet metal screws are often used to secure the ends of the insert where they butt at the transom. This is attractive if trim rings are used around the screw heads. Any gap between the ends of the insert should be filled with caulking. Black poly- urethane caulk matches with most of the black inserts available.
Transom Corners
The only places where trouble installing a new rail may be encountered are at the corners where the transom meets the sides of the boat. Aluminum metal track is soft enough to be bent around these corners. A bent corner makes installing the insert much more difficult because the channels which hold the rubber insert are distorted by the bend. Careful work with a small pry bar or screwdriver tip can usually open up the channel enough for the insert to fit. It takes time and very careful work, but there are only two corners.
Stainless steel tracks and many rigid plastic rub rails simply will not bend. This type of rub rail requires special molded fittings to accommodate the transom corners. These may be made of the same plastic as the rub rail or they may be metal castings. Either way, they must be purchased with the rub rail. Many boat factories have special castings made for transom corners that become part of the overall boat design. Special "signature" castings should be retained when the old rail is removed and re- installed with the new rail.