All About Anchors
A complete guide to anchor gear selection
Nothing extends your cruising range more than good ground tackle. With the right combination of rodes and anchors, you're free to enjoy quiet evenings in secluded backwaters wherever the end of day finds you. Without proper anchoring equipment, night forces you to huddle gunwale-to-gunwale with other boats in crowded and often noisy marinas.
Of course, there's nothing wrong with spending a night or two in a first-class marina. Shoreside amenities like good restaurants and historic sites add much to cruising. However, the way to fully enjoy a cruising boat is to exploit its ability to be free of worldly entanglements. A boat that has to be plugged into electric power every evening is little more than a vagrant cottage.
Anchors have been around since slightly after the first person put to sea in a hollowed-out log. The simplest anchor is a big dumb weight at the end of a rope. Probably invented by Ogg about the time people went into caves to get out of the rain, this type of anchor is still used by inland lake fishermen. The modern version is often a gallon paint can filled with cement and an eye bolt for the rope. Crude and ineffective, the big dumb weight anchor belongs on somebody else's boat.
Historically, the next refinement is called the "killick." (The word is old Norse.) The big weight was retained in the form of a stone, but some bright sailor added a bent stick or piece of iron to dig into the bottom. He soon discovered that hooking his boat to the bottom was a lot more efficient than using a big, dumb weight.
Over the years anchors slowly evolved into the traditional ship's anchor we see so often in nautical artwork. This anchor has a long shank, a crown, and two flukes. At right angles to the flukes is a large wooden stock which makes sure one of the flukes is always positioned to dig into the bottom. Despite several thousand years of refinement from the killick, the traditional ship's anchor still relies on the old weight-and-hook principle.
A modern fiberglass boat is no place for a big, heavy anchor with iron points. Keeping the topsides scratch-free is hard enough without that deck-wrecker hanging about. Fortunately, we have more choices than caveman Ogg. Modern anchor styles range from the ubiquitous Danforth-type to CQR and Bruce plows.
The secret to modern anchors is not just dead weight, it's the ability to sink into the bottom. Often a modern anchor will completely disappear into soft sand or mud. Design is more important than weight. Heavy iron has given way to lighter high-tensile steel and positively feather-weight aluminum. Despite light weight, their potentially tenacious grip on the bottom sets modern anchors apart from their historic cousin.
An anchor is attached to the boat by the "rode." Modern sailboat rodes are either nylon rope or chain. Most boats operating outside coral waters prefer a combination rode made up of nylon rope with a length of chain ahead of the anchor. This combination provides good holding power combined with the shock- absorbing qualities of nylon. It is also much lighter in weight than the all-chain rode preferred where sharp coral might cut through nylon rope.
Most discussions of ground tackle consider only the anchor and the parts of the rode. However, I have always thought that certain parts of the boat's deck hardware should also be included. Every boat needs a riding bit or cleat to which the rode is attached when anchored. Few boats of today's production boats have true riding cleats or samson posts for the anchor rode, so this job must be given over to an undersized mooring cleat.
Also overlooked (or forgotten completely) is the hawse hole or chock used to guide the rode over the bow and to protect it from chafe. All of this deck hardware should be considered part of the boat's ground tackle because of its importance to the proper functioning of the anchor.
Choosing An Anchor
From the outset let's get one thing straight: there is no perfect anchor. In fact, no single type of anchor will perform equally well under all conditions. That's why knowledgeable skippers carry two or more anchors of different patterns. They know that in some anchorages a plow anchor may break out while a stock-in-head style (e.g. Danforth) will hold forever. In other anchorages the plow may be the only "hook" worthy of the name. Each style of anchor has its strong and weak points. Let's take a look at the three general patterns available in today's chandleries:
Traditional (also called "Yachtsman"): This type of anchor is really a yacht-size version of old-fashioned ship anchors. The major difference is that the stock is made to fold flat against the shank for storage. Traditional anchors work well in rocky bottoms, hence the nickname of "rock pick." They also penetrate easily through weed beds. Drawbacks of traditional anchors include weight, difficult stowage and a propensity to foul the rode when in use.
Lightweight Stock-In-Head: The best-known anchor of this type is made by Danforth. In fact, many people call all anchors of this type "Danforths" without regard to the name of the manufacturer. True Danforth anchors are the best of the lightweight stock-in-head breed due to their quality construction and precision angle between the stock and flukes. There are several quality competitors, but beware of cheap imitations with shoddy workmanship, inferior materials or poor design.
Design, not weight makes the stock-in-head anchor work. Reliable versions are built of high-tensile steel and aluminum. An aluminum anchor suitable for a large cruiser can be lifted with one hand.
Stock-in-head anchors are best in sand or loose pea gravel where they literally bury themselves out of sight. The holding power of a well-set anchor is phenomenal. Big Danforth anchors were used to pull the battleship Missouri off the sand when she went aground at the end of World War II.
Stock-in-head anchors have two major drawbacks. One is they have virtually no holding power in weeds. The other is a propensity to wedge themselves into rock crevasses so tightly they become a permanent part of the lake bottom.
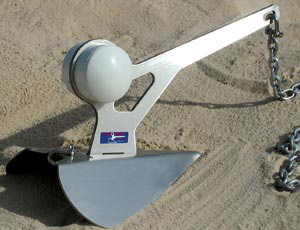
Plough Style: Most people immediately call to mind the CQR anchor, which is shaped much like a farmer's plough. The Bruce anchor, which looks more like a spacecraft than anything you would find on a farm, is best classified as a "plough." Both rely on a combination of weight and their special shapes to force them to dig (or "plough") into the bottom under strain from the rode.
Plough anchors have become the badge of the cruising sailor, and for good reason. Experience has shown them to have exceptional holding power in nearly every type of bottom except smooth rock, where nothing holds.
Weight and clumsy handling are the two big disadvantages of plough-style anchors. The only way to stow one is on a specially-designed stemhead fitting or bow roller. Another disadvantage is their relatively high cost compared to stock-in-head anchors.
Because each style of anchor has its good and bad points, a properly-equipped boat carries a variety of anchors. Typically, a minimum of three should be carried: the "lunch" hook, the working anchor and the storm anchor. Each of these anchors has a specific job.
As its name implies, the lunch hook is intended only for short stays such as a quick lunch in a secluded cove. It is light in weight for easy handling and relatively small for easy stowage. Because of its small size and weight, the lunch hook is not intended as the primary anchor for overnight use or for those times when the boat will be unattended.
The working anchor is intended to hold the boat under normal weather and sea conditions. It is large enough to be used in an overnight anchorage or when the boat will be unattended for brief periods in fair weather. The working anchor should always be stowed ready for immediate use in case of an emergency such as an engine failure upstream of a low bridge.
The largest and heaviest anchor aboard is the storm or "sheet" anchor. It should be at least one size larger than the anchor manufacturer recommends for the boat. A storm anchor is set in any overnight anchorage when deteriorating weather is expected. It should also be set when the boat will be unattended for more than a few hours in good weather. The storm anchor may also be used as a lunch hook when nothing else will hold.
Choosing The Rode
The noun "rode" describes the rope and chain between the anchor and the boat. The word seems to be of New England or eastern Canadian origin. It is obviously derived from the way sailors say that a vessel "rides" to her anchor. Outside of North America, the term "cable" is often used in place of "rode."
The typical rode is a combination of nylon rope and chain. Nylon rope has amazing elasticity. It can stretch up to 25 percent before reaching its elastic limit. This means that when the boat comes up against the rode, the stretch of the nylon cushions the shock. You don't really appreciate this feature of nylon rope until you try to sleep through a night squall with the boat constantly jerking on the rode.
Chain, on the other hand, is heavy. Placing a length of chain between the nylon and the anchor drags down the catenary curve of the entire rode. The result is a more horizontal pull on the anchor. This is important because a horizontal pull helps the anchor to dig in, while a vertical pull can jerk it out of the bottom.
Chain is also a lot tougher than nylon. Sharp rocks, broken bottles and other objects on the bottom can cut or chafe nylon rope. Even sand can abrade nylon if the rope is pulled into the bottom by a deeply buried anchor. Chafed nylon has been the cause of more than one lost anchor which, in turn, has meant the loss of boats as well. Chain, of course, is relatively impervious to this damage, something to consider if you're trying to get a good night's sleep on the hook.
A minimum of 15 feet of proof coil hot-dipped galvanized chain should be used in every anchor rode. Most boats need more than this minimum amount of chain for their working and storm anchors. As a rule-of-thumb, there should be one foot of chain for every foot of the boat's waterline length. This works out to between 22 and 25 feet for the average 30 foot LOA sailboat. Quarter-inch chain is fine for boats up to about 30 feet LOA. Larger boats should use 3/8 inch chain.
Connect the chain to the anchor with an appropriately-sized galvanized shackle. The shackle pin must be seized with several wraps of stainless-steel wire to prevent the pin from unscrewing. More than one boat has been lost because of forgetting this small detail. Make sure you twist the ends of the seizing wire into the protection of the shackle so they won't be likely to scratch or cut either you or the boat.
Recently, some people have been using nylon wire ties in place of stainless-steel seizing wire. These ties work well in terms of keeping the shackle pin from unscrewing. Howver, many depend on a small piece of metal to keep the tie from opening. This metal is seldom marine-grade stainless-steel and must be suspect anytime in salt water or after a few uses in fresh water.
The chain can be attached to the nylon rope in a variety of ways. There is (believe it or not) a rope-to-chain splice, although almost no one knows how to do it. Some people prefer to put an oversize shackle in the end of the chain and tie a bowline in the rope. Bowline knots have the advantage of being easily renewed if chafe begins to be a problem. However, the knot is often too large to fit down a hawse pipe.
Most people splice a galvanized steel thimble into an eye at the end of the nylon rope. A shackle connects this eye to the end of the chain. Steel thimbles are virtually impervious to wear, so provide almost complete protection for the rope. Steel thimbles eventually rust and look ugly, so nylon thimbles are becoming popular. These seem to wear well and they never rust, but galvanized steel is still the choice of belt-and-suspenders traditionalists.
The wise skipper splices two thimbles in his rodes, one at both ends. We'll see why in a moment. For peace of mind, take an extra tuck in the splices when you install the thimbles. You won't stay up nights wondering if the strain on the rode will pull the eye out.
Avoid the temptation to buy oversize rope for your anchor rode. Although heavy rope seems safer, the added strength comes at the expense of elasticity. An oversized nylon rode won't stretch properly, so the boat come to a halt with a jerk as it rises to the anchor. Being jerked to a halt puts extra strain on the riding cleat and other deck hardware. It can also be a major factor in the failure of an anchor to stay buried in the bottom.
Old-fashioned three-strand laid rope is a better choice for an anchor rode than modern yacht braid. Again, the reason is stretch. As laid rope comes under strain, it twists. This twisting actually allows the rope to get slightly longer, adding to its shock absorbing qualities.
Few things are as aptly named as the "bitter end" of an anchor rode. This is the end of the rope opposite to the anchor, the end that is always supposed to stay in the boat. It's a bitter experience, indeed, to see that end go flying over the side.
To prevent losing an anchor this way, the bitter end should be firmly secured to the boat. The easiest way is to mount an eye bolt in a convenient location. Stainless steel bow eyes designed for trailerable boats are ideal for this purpose. They are inexpensive and readily available. Be sure the eye is firmly bolted to a structural member of the boat with the appropriate backing blocks.
Never secure the bitter end to the eye bolt with a metal shackle. The time may come when you'll have to slip the anchor rode in a hurry. Use 1/8 inch nylon cord to tie the bitter end shackle to the eye. Then, if you need to slip the anchor, it can be done quickly with the slice of your rigging knife. Many prudent skippers secure a small knife with a lanyard to the eye just for this purpose.
Anchor rodes should be reversed from time to time to equalize wear on the rope. That's the reason for splicing thimbles into either end. Turning your rode end-for-end is the matter of a few minutes work if both ends have thimbles. Otherwise, you'll be most of the afternoon with fid and rigging knife getting the job done.
Deck Hardware
Few boats (even large, expensive ones) are equipped with proper anchoring cleats. Smaller cleats intended for dockside mooring are seldom suitable to handle the potential strains of anchoring in foul weather. Installation of a good anchoring cleat is not difficult. Through bolt it on the centerline as near the bow as possible. (Sailors will want to keep it out of the way of the jib tack.) Check to make sure the rode will run fair to the chock or hawse hole before drilling any holes.
Anchoring cleats should always have massive backup plates to spread the strain over a large expanse of fiberglass. Quarter- inch plate aluminum is ideal because it won't rot or corrode. Self-locking aircraft nuts (with nylon inserts) should be used on all bolts.
Beware of fiberglass decks cored with balsa wood. You can cause real problems if you don't know how to install hardware through a cored deck. This is one time when it's better to let a professional do the work than do it yourself.
Nothing makes handling a heavy anchor easier than a properly installed bow roller. In fact, it is virtually impossible to manhandle a Bruce or CQR anchor safely without a roller. The best place for this roller is as part of a stout bow platform. If your boat does not have a platform, it might pay to consult a local expert on designing one that will have enough strength. The strains imposed by an anchor rode can be considerable ... enough to twist an improperly designed platform right off the boat.
Manual or electric anchor winches take the "oooofff" out of raising the anchor. Unfortunately, these are among the most expensive of optional equipment. Still, a good anchor winch is better than a jug of aspirins when it comes to preventing a heart attack or strained muscles. Electric winches do the work at the push of a button (usually a foot switch mounted in the deck). Manual winches require human power, but still make raising the anchor a lot easier. They are also much less expensive.
Whether powered by your muscles or an electric motor, any mechanical winch should be purchased in combination with the rode. It is critical that the drum be large enough for the intended rope and that the "gypsy" be sized for the chain. A gypsy designed for 3/8 inch B-B-B chain simply won't work with 3/8 inch proof-coil chain. Many winches are designed for European measure chain and won't accept chain from a U.S. manufacturer. Always check a sample of your chain before you buy any mechanical winch.
Avoid equipment that winds the anchor line on a drum like a fishing reel. This sort of system works fine on a small fishing boat, but proves to be a disaster when anchoring a large cruiser. Think about untangling a backlash in 3/8 inch nylon rope!
Stowing The Rode
On larger boats the anchor rode should be led below through a deck hawse pipe which can be covered to keep out the rain and spray. Be sure to install one large enough to accommodate the chain-to-rope eye splice and shackle. The metal cover should be attached to the boat with a short length of chain to avoid its accidental loss.
An anchor rode stowed in a forepeak locker will not tangle if it is allowed to lay exactly the way it tumbled down from the deck. If you attempt to move the pile or rope or disturb it in any way, you're almost 100 percent certain of trouble when the time comes to run out the rode. If a dedicated forepeak locker is not available, the best alternative is to coil the rode into a laundry basket stowed beneath the hawse pipe.
Stowing the anchor rode on smaller boats can be a real problem as they usually do not have a special locker for the job. An elegant solution to the problem is suggested by studying Nantucket whaleboats of 150 years ago. Whalers would carefully coil their harpoon lines into tubs, then place these tubs into their boats. When a whale was struck, the line would smoothly pay out of its tub.
A modern version of the whaler's line tub is a plastic laundry basket. Long lasting, these baskets are more than strong enough to hold several hundred feet of rope. Coil your rode carefully into the basket, then stow the basket in a lazarette or in the back of a quarter berth. The rode comes on deck basket and all when the time comes to drop the hook.
Small boats may find special cloth "anchor bags" ideal to keep both anchor and rode properly stowed. The bitter end comes through a grommet in the bottom of the bag so it can be secured to the boat before the anchor is lowered. Anchor and chain come out through the wide opening in the top of the bag.
Table #1 Nylon Rope Strength (3-Strand Twist Construction)
| Diameter | Breaking Strength |
| 3/8" | 4,400 lbs. |
| 7/16" | 5,900 lbs. |
| 1/2" | 7,500 lbs. |
| 5/8" | 12,200 lbs. |
| 3/4" | 16,700 lbs. |
| 1 " | 29,400 lbs. |
Note: Above breaking strengths are averages for all nylon ropes of standard 3-Strand, twisted construction. For strength of specific rope, ask manufacturer.
Table #2 Anchor Choices Boat Length
| Anchor Type | Under 16 | 20 | 25 | 30 | 35 |
| Danforth (tm) Std | S-600 | S-600 | S-920 | S-1300 | S-1600 |
| Danforth (tm) Deepset | D-750 | D-750 | D-1150 | D-1650 | D-2000 |
| CQR (Plow) | 20 | 20 | 25 | 25 | 35 |
| Bruce | 4.4 | 11 | 11 | 16.5 | 22 |
Note: All anchors specified in Manufacturer's model numbers which may or may not reflect the actual weight of the anchor. Sizes indicated for normal use. Use at least one size larger for storms.
Table #3 Suggested Chain & Rope Sizes (1) Boat Length
| Under | 16 | 20 | 25 | 30 | 35 |
| Chain Size | 3/16" | 3/16" | 1/4" | 5/16" | 5/16" |
| Min Chain Length | 10' | 15' | 20' | 25' | 30' |
| Rope Diameter | 3/8" | 3/8" | 1/2" | 1/2" | 5/8" |
1. Sizes shown are for normal conditions. Increase length of chain and rope in storm conditions.