Installing A Transom Shower
Nothing beats a quick rinse off after a swim in salt water
Nothing is more luxurious than being able to rinse yourself off with fresh water after swimming or water skiing in salt water. A simple telephone-style shower fixture mounted on the transom of your boat makes this possible. No shower enclosure is necessary. You just stand on the swim platform to rinse the salt out of your hair or off your body. Special transom mount shower fixtures are available from a variety of manufacturers. Most consist of a molded plastic box that fits into a cutout in the transom. The shower head on a flexible hose stows in this box when not in use.
Cutting the hole for the box is the hardest part of this job. More precisely, getting the courage to cut the hole is the hardest part. It's obvious that a mistake will require expensive repairs on one of the most visible portions of the boat. More than one boat owner has gotten a serious case of the "yips" over cutting a hole of this magnitude in his boat. I've had guys hire me to drill the first hole for a project of this type just because they didn't have the courage.
Wood workers have an adage that advises to "measure twice and cut once." The idea is to measure carefully, then carefully check your measurements before making the cut. What's good advice in wood is doubly good when working in fiberglass where repairs are harder and more expensive. A good way to avoid a mistake is to make a mockup of the shower fixture and tape it to the transom of your boat. Most fixtures will come with a template for marking the transom cutout. If yours doesn't have one, draw around the actual fixture to get the shape of the cutout. Transfer this shape to a piece of thin red cardboard (the stuff kids use for school projects). Use another color if you have a red hull.
Tape the red cardboard template to the transom where you want the shower located. Step back to admire your work. Does the template appear "square" with the boat? One of the funny things about boats is optical effect of the curved hull lines. You may have to tilt the template in order to make it look straight. Trust your eye for this part of the job. If it looks right, it's probably right. Using red cardboard (or some other contrasting color) makes it easy to see any problems in the visual alignment of the template.
Next, go inside the transom to make sure that the area behind the template is free of wiring, plumbing or control cables. If nothing is in the way, go back outside and draw a heavy pencil mark all the way around the cardboard template before removing it from the transom. The result is a pencil outline of the required hole in its exact location.
Here comes the part where courage is needed. It's time to drill the first corner hole for the saber saw. You'll drill at least four of these holes, but the first one takes the most courage. I use a 5/16- or 3/8-inch drill for final size of these holes, but first I make a pilot hole with a 1/8-inch drill. It's a lot easier to fill a 1/8-inch hole if I make a mistake than to fill a hole three times as large.
Don't drill the pilot holes in the exact corners of the pencil lines. Pilot holes must be set back from the sides of the cutout by half the diameter of the larger drill bit. Otherwise, your corner holes will wind up outside the pencil lines. Insert your saber saw through one of the corner holes and begin cutting along the pencil line. Fiberglass is tough stuff that dulls cutting tools almost instantly. Expect to wear out a blade or two. Be sure not to breathe any of the sawdust as it contains microscopic shards of broken glass and resin. A dust mask is good protection. Cut to the inside of your line. You can always enlarge a hole with the saw or a file, but there are no easy ways to reduce the side of the cutout if you make it too big.
Offer the fixture to the cutout. If you've done things right, it will just fit or (better) it won't quite fit into the hole. Use a rasp or your saber saw to adjust the cutout as needed to get the fixture to slip into the hole. Remove the fixture and examine the cut edges of the transom. If all you see is fiberglass, you're in luck. However, if your transom has a wood core, you must seal this wood against water intrusion. Epoxy resin would be my choice, although polyester resin is easier to find. Work carefully to avoid getting any resin on the outside of the transom. Do not fail to seal wood core. The penalty for failure can be terminal transom dry rot.
Once again offer the fixture to the cutout. Use the fixture as a template to drill pilot holes for the mounting screws. Then remove the fixture and coat the mounting lip with an appropriate sealant. Since this is above the waterline, silicone will do as long as it is compatible with the plastic box of the shower fixture. (Some plastics can be damaged by silicone.) My choice would be a white polysulfide compound. I would definitely not use a polyurethane adhesive sealant as it would virtually prevent removal of the shower at some future date. Install the fixture into the cutout and tighten down the mounting screws. Clean excess sealant off the transom.
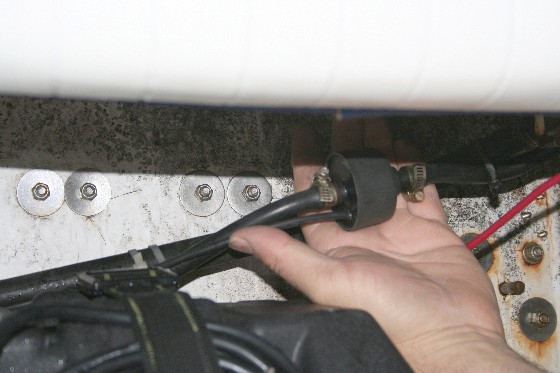
Remove the fuse or switch off the circuit breaker feeding electric power to the potable water system pump. Open at least one cold water tap to let any residual pressure out of the water system. Then install a "T" fitting in the output line from the pump. The type of "T" you choose will depend on the type of plumbing installed in your boat.
Clear plastic tubing is probably the easiest material to use for the plumbing run to the shower fixture. Buy enough to make the run in a single piece. Be sure the tubing you purchase is labeled as "food grade" because it will be part of your boat's drinking water system. Double hose clamps should be used on all fittings as this hose will be under continuous pressure when the water system is energized.
Rigid plastic pipe is more difficult to install than clear plastic tubing. Hardware stores and plumbing shops carry several styles. Some can be "snapped" together with press fittings while other types of plastic pipe require assembly with special glue. Rigid plastic piping is always recommended for hot water supply. Hot water causes flexible tubing to soften and slip off hose fittings despite the best of clamps.
Whether you use rigid or flexible plumbing, you must route it as high out of the bilge as possible. This prevents any possible contamination of the drinking water with bilge water in the event of a minor leak in the plumbing. Also, use plenty of clips to secure the plumbing to bulkheads or stringers. Normal vibration will crack a long run of unsupported pipe. If you do not hook up hot water to the shower, you must cap the hot water inlet to the fixture. If you don't, then cold water will come out of the inlet if the hot water tap is opened when the shower is in use.
Always test new plumbing for leaks under pressure. Don't ignore even the smallest weep. Any leak in a pressure water system on a boat will cause the water pump to cycle continuously. Not only is this not only hard on the pump, but it also tends to wear down your battery.